
Showing posts with label commission. Show all posts
Showing posts with label commission. Show all posts
Friday, November 19, 2010
phoenix finished!
I finished both the phoenix pendant and a pair of earrings for a friend yesterday. Feels good to keep moving forward. Since I have been caring for my mom full time the last 3 years it seems like I get slower and slower in my jewelry work each year.
"Dare to Rise Up from the Ash" - sterling, copper, brass, simulated sapphire, enamel on fine silver, garnet and amber, and "Angel" earrings - sterling and garnet.
Monday, November 15, 2010
phoenix progress #2
I finished the four enamel shield shapes for the phoenix last week and Chelsea choose #3:

I'll probably use the others someday in other pendants. I have made enough progress on the phoenix that I'm soldering down the bezels, the silver balls and the cut out copper wings today. The little sticks of solder laying on the neck will melt and then I can attach balls there too:

I'll probably use the others someday in other pendants. I have made enough progress on the phoenix that I'm soldering down the bezels, the silver balls and the cut out copper wings today. The little sticks of solder laying on the neck will melt and then I can attach balls there too:
I love looking at the roughness of everything at his stage, on the burnt surface of the soldering block. When it is finished it will be so totally different.
Thursday, October 21, 2010
cutting, stamping, doming
Last Friday I wrote that I would get started on enameling the phoenix over the weekend - here it is Thursday and I'm just now at the point where I can start to enamel (things seem to take longer and longer all the time!). Today I finished cutting out, stamping and doming the copper and silver shapes that I will soon (I always say that) be able to start enameling.
The shield shapes are going to be potential phoenix bodies and the oval shapes with BE HERE NOW stamped on them are going to be potential rings. The circle on the far left is going to be a pendant for my sister. Generally I like to make multiples of enamels for a major piece so the customer can have a choice which would be their favorite.
Friday, October 15, 2010
phoenix progress
Today we have decided on the final shape of the phoenix pendant and where the bails will go on the back. I'll get started this weekend enameling the "body".

I really do love the day and age we are living in now. With digital cameras and email it only takes a minute or two to get a photo of a sketch ready to send for approval. The customer can stay home and so can I. Seems too good!
Thursday, October 14, 2010
a look at the design process
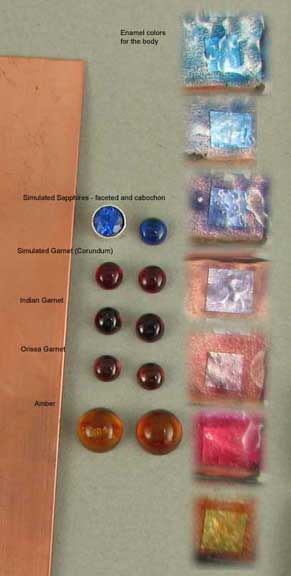
Here is a photo of an artwork that Chelsea wanted me to use as a design jumping off point for a phoenix pendant - her hope was that it would have purple/blue colors and red/pink colors like the painting along with warm brown/orange colors so she can wear it with both warm and cool colors:


Then put them together to show the client to see what she thinks:

First step - start making sketches - even if I don't really like the first ones they are part of the process to find out what works:
Pick out and play around with colors:

Chelsea got back to me and did like the design but would like me to adjust the top of the wings. I'll try to keep this journal updated with it's progress!
Friday, September 24, 2010
completed and ready to go!

Saturday, September 11, 2010
finished

Monday, May 24, 2010
a little about polishing stones
Just for interest - photos of a project I'm doing - creating a stone to fit in this ring setting. The original stone broke and was lost and the customer asked me to create a new stone and reset it. Shown with it's future setting and with the size of stone I started with. An 8 by 10mm oval seemed like a good starting point to grind down to the 4 by 8.5mm oblong size I need for the setting:

The little black onyx stone on it's dop stick - I spent yesterday grinding it to this shape with 120 diamond grit. The dop stick is basically just a wooden dowel with dopping wax melted on the end. The dopping wax is very sticky when hot and pliable so it can be attached to the stone but at room temperature it gets hard and can hold the stone while you work on it. When I'm all done I will put it in the freezer and the stone should pop off easily:

This is the spool polisher I will use today to get a nice polish on the little stone. Those syringes in back hold grades of diamond cream which correspond to the different areas on the spool that I will apply the cream to. I will work the stone from 350 grit up through 50,000 grit to a high shine:

I will need to do some adjustments to the silver ring setting too. I think the original stone broke and fell out because it needed a more stable base for the stone so I will be adding a sterling plate to make a solid bottom for the setting.
Monday, January 11, 2010
completed


Wednesday, December 30, 2009
finished

I finished those dark oxidized rings I showed last time. The stones are set and everything is polished now. The two wedding style rings are for my friends, Gayle and Karen (copper appliques and amethyst for Karen and brass appliques and citrine for Gayle - I hope they like them!), and the adjustable ring with black mother of pearl and black onyx on the left is for an etsy customer.
Subscribe to:
Posts (Atom)